
Novel and creative were the ideas presented for the making of holiday gifts at the recent Christmas workshop held at the fairgrounds, east Warsaw.
Many women of this area attended the exhibits and demonstrations presented during the two-day event. All returned to their homes enthusiastic, eager to experiment, carry out the ideas and suggestions which they thought would help to make this year's pre-Christmas season for them one of pleasure, rather than one of worry and tension.
An exhibit that appealed to those interested in making Christmas gifts was that of Mrs. L. E. (Ruth) Shoemaker of Warsaw, on "Inexpensive Gifts for Children and Adults."
As wife of the pastor of the Church of the Nazarene in Warsaw, homemaker and mother of two lively youngsters, Judy Ann, five-year-old kindergartner, and Ronnie Gene, eight, third-grader, at East Ward, Mrs. Shoemaker leads a busy and worthwhile life. She also has a hobby.
"Some people take a walk, read and do many other things to relieve tension," Mrs. Shoemaker said. "I make things with my hands."
Has Natural Talent
Having a natural talent with paints and brush, Mrs. Shoemaker
turns out some beautiful and useful items. As a rule they are
inexpensive, for she with imagination uses those things normally
to be found around the home. Most of the items exhibited were
her own.
In the past Mrs. Shoemaker has taught adult craft classes and instructed children in the art at summer camps. We are sure that the reader will find many of her suggestions on making the gifts helpful and worthwhile.
Have you often wondered what to do with your daughter's many silk scarves? Make a hanger for them. Drill four holes in wooden coat hanger, paint it gold. After painting four wooden clothes clips red. flat black, gold , and gold and black, hang clips from holes in hanger with thin leather strips of pigskin. Plastic lustre lacing can also be used.
Mrs. Shoemaker uses masonite squares with flowers painted in oils on them for plaques. Some round plywood circles pictured animals and fish. When plaster of Paris is the material a box lid makes a very good form. Small shells were placed in the wet plaster, forming petals and leaves of flowers. Two shells, placed back to back help balance the plaque.
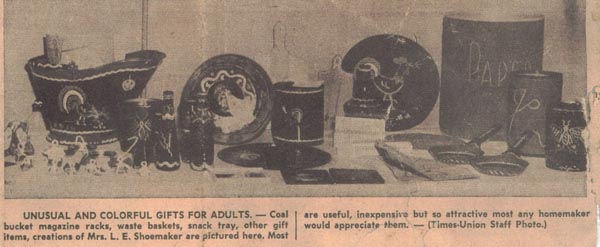
Coal and milk buckets make very nice magazine racks or waste paper baskets. Paint with good grade of black enamel inside and out. Trim top and bottom with red enamel. Designs are put on with oil paints.
Fruit juice cans, enameled black, with oil paint designs make attractive flower vases. Chicken wire, doubled over and "scrunched" to fit the inside of the can will hold flowers where you want them.
A one-gallon oil can, painted red and black and trimmed with white, yellow and green oil paints will make a fine container for desk scrap paper. Wavy lines, dots and dashes are used in the design at the top and bottom of can.
Bud vases, made of salad dressing bottles, were painted black, decorated with white and pastel shades of oil paints.
Gifts for Kitchen
In Mrs. Shoemaker's kitchen hangs a
small pair of skillets. She has painted them with red and black
enamel and on them designed fighting cocks. A pizza pie tin, also
painted black, pictures a large strutting rooster. This is a snack
tray.
Vacuum-packed peanut can lids, painted featuring geometrical design become colorful coasters. Plain chop boards and sandwich boards take on an air of elegance once decorations are painted on them.
The oil paints used in making these items were thinned with turpentine, clear varnish and oil paint thinner. This will dry in 24 hours. Over designs, a coat of picture varnish is applied seven to ten days later.
Choir boys, angels and bells can be made from tin can lids. Mrs. Shoemaker has given the following instructions for making these.
Basic steps: Using a wall type can opener makes the edges of the tin can lids smooth. With a nail pound a hole in the center of each lid. Be sure to place a block of wood underneath to prevent any injury to the working surface. Using tin snips cut four well spaced slits from the outer edge toward the center hold. Do not cut into the hole.
Angel -- Bend down two opposite fourths of the lid. With needle nose pinchers roll these newly cut edges under. This is the body of the angel. The two opposite and remaining fourths of the lid are bent up slightly which makes the wings. Roll these edges very slightly. Bend a pipe stem cleaner double and pull the two ends through the whole in the lid. Leave a portion of the doubled end which makes the head. Bring one end of the cleaner around each side toward the front, making arms and bend the very end into folded hands, which gives the allusion of a praying angel.
Choir boy -- Similar steps as for the angel, except on the two remaining quarter sections, using the tin snips cut off a small band from each outer edge, making the surplice on the choir boy shorter in length than the wings of the angels. The edges are rolled under using needle nose pinchers. Pipe stem cleaner is brought through the center hole. One end of the cleaner is brought down the surplice making the arm of the choir boy. The end is bent back and forth to make little hands which hold a tiny choir book made of white card stock.
Bell --Using the basic steps, of a hole in the center, and four slits bend down two opposite side. With the needle nose pinchers make a definite bend at the side of the newly cut slit. Do this to all edges, making eight of these bent places. Now fold one of these bent edges over the next one. This will give a bell shape. A single end of a pipe stem cleaner is thrust through the center hole, pushing it down far enough to accommodate a tiny Christmas tree bell. The other end of the pipe stem cleaner is bent slightly to hang over a twig of your tree.
A Christmas door knob decoration is made with a combination of four sizes bells made from can lids. These are fastened to a long party sized cleaner which makes the loop to fasten over the door knob. A perky red bow is tied in the place where the four bells are fastened.
Letter rack and matching napkin-holders were made from hardware cloth, which was washed in hot soapy water to remove the protective film. Bronze or gold paint was used with a brush. The edges of the letter rack were rolled over a pencil, thus making it a pencil holder also. cut with tin snips.
Waste paper baskets made from heavy round carton, covered with crinkled crepe paper. Measure the length around the carton and also the height. Cut crepe paper to this measurement, with the grain going up and down. Stretch carefully the entire piece. Using Evans or Carters white school paste (no other kind will work) paste a strip of the carton from the top to the bottom. Press one end of the crepe paper into this paste, and taking the fingers push one way, and in a nearby space push the opposite directions. In the fresh paste this will push with ease. Continue this until the entire carton is covered. Finish off the top, and the bottom with a strip of masking tape, or colorful freezer tape. For the letters "PAPER," twisted crepe paper is pasted to the crinkled crepe paper. To make twisted crepe paper cut a strip from the entire end of a package of crepe paper. Stretch this, and tie one end to the beater of the electric mixer. Have someone to hold the other end. Two strips can be made at the same time.
The basket should dry at least 24 hours and then several coats of thinnest shellac should be applied, with drying time between.
The small waste basket for sewing snips was made from a large size oatmeal box. Twisted crepe paper was formed into the shape of scissors, needle and thread.
Textile painting featured hand painted pillow slips, place mats, napkins and handkerchiefs. There was also a large pair of pictures which consisted of huge designs of morning glory textile painted, matted and framed under glass.
Children's Gifts
Having two children of her own, it
was easy for Mrs. Shoemaker to come up with some excellent gift
ideas in this category.
Hand and foot prints of small children were framed. White poster paint, or white shoe polish can be used on the child's foot and hand. Press immediately on black construction paper. Several of these might have to be made before a good copy is secured. Be sure to press down the fingers in order to obtain a full hand print. These can be cut out and pasted on a sheet of black construction paper the size of the white frame you are to use. With a tiny brush print the child's name, age and weight. These are lovely gifts for grand-parents.
Cloth book --A textile painted booklet made from double sheets of white cloth. Pictures are painted free hand of animals, children at play. There was a double page of a train running downhill.
Felt pictures -- The designs were cut from old felt hats, pasted to black construction paper. The face and hands were of flesh-colored construction paper. The frames were cut and mitered at a lumber company from ponderosa pine. A jug size 6 x 9 and also 9 x 12 was used to make the frames. Each corner was glued and nailed. A white flat coat was applied to the frames, when dried, sanded lightly before the white enamel was applied. Glass obtained from the lumber company in the exact sizes was used. The back of each picture is sealed with masking tape, and two screw eyes were placed to hold the picture wire. These make fine gifts for the children's room. Be sure to wash the felt before using.
Train --A train was designed and cut from plywood, using a white flat coat. Sand and then use different colors of bright enamel, which appeal to children. Using a small drill, a hole was drilled into each piece to enable the train to be placed on the wall of the room. There is a station house, which boasts of a man with a large lantern. There are two railroad signals,. Place the train in a position of going down a hill, etc. It is the action which delights children.
I have used a similar set and nailed it to the toy chest, which is painted white.
Baseball bat, hat and mitt -- This set was cut from plywood with a hole drilled for hanging. The bat was about ten inches tall, and the rest scaled accordingly. This can be painted in the boy's school colors, using enamel or poster paint. Shellac after it is dry.
Pencil, crayon cans -- These were made from small size frozen juice cans, and also small size baked bean cans. Paint with black enamel, use simple design of a house, fish, train, clown, or boat, in oil paints.
Large wooden puzzles were made from a heavy grade of plywood about 14 x 14. Draw a simple design of an animal, using the pattern from a color book or animal pillow pattern. With a jig saw cut out the animal only, leaving the rest of the board in one piece to become the frame for the puzzle. Cut the animal into four or five pieces. Nail this frame to another piece of heavy plywood the same size. Sand the edges and round the corners. Use a flat white coat for the entire sides, top and the animal. Sand slightly and enamel white. Enamel the animal a bright color. When dry add eyes, nose and etc.
|
|
|
|
|
Warsaw Times-Union October 15, 1956